

Baron / Baroness
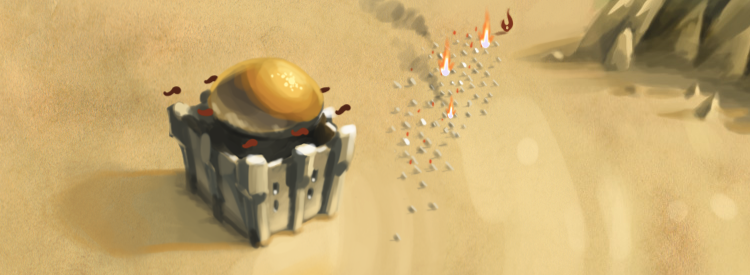
Fort Rox

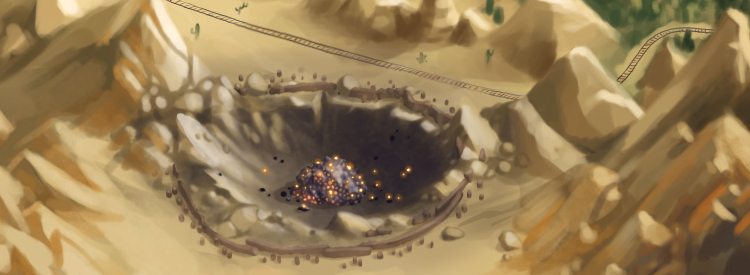
A strange meteor has landed near Claw Shot City, leaving a huge impact crater near the Gnawnian Express rails! This mysterious meteor brings with it a mysterious new breed of mice and their presence threatens the lives of the citizens of Varmint Valley. Around the crater, an encampment of hunters has surrounded these dangerous mice and are setting up a fort to hold them back!
You thought the nightmare from the train is over, its not!
Fort Rox is Mousoleum on steriods, the starting is going to be tough but you can do it. Start off by collecting Meteorite Pieces during the Day using S.L.A.C II, Aqua Base and Gouda. Loot 50 Meteorite Pieces, get the Wall Upgrade #1 (Basic Wall) and the Mage Tower Upgrade #1 (Spotlight Enchantment).
Upgrades can only be obtained during the day and upgrades of the same category must be made in order. the effects stacks. Do not turn on your Tower Mana in the Day.
There are 2 types of cheese to be used at night in Fort Rox - Crescent Cheese and Moon Cheese. Crescent Cheese is the "Gouda" and Moon Cheese is the "SuperBrie+" equivalent. You can farm Crescent Cheese and sell them on the Marketplace for some gold if you wish to. It is generally not advised to use Moon Cheese as it is very expensive. Once you have at least 15 Crescent Cheese, you can click "Defend Fort" to enter Night and being your real journey.
Phases of Night
- Night consists of 5 phases
- Twilight (35 hunts)
- Midnight (25 hunts)
- Pitch (10 hunts)
- Utter Darkness (25 hunts)
- First Light (35 hunts)
Each hunt gets you deeper in Night. However, Failure to Catch (FTC) Nightmancer Mouse extends Night by 3 hunts, which may push you back to a previous phase.
Several events at Night and Dawn cause damage to Wall, as listed in the table below. You are immediately sent back to Day if your Wall has no remaining health or you click “Retreat” during Night.
Any damage to the wall can be repaired using Meteorite Pieces during Day only.
Since Battering Ram Mouse deals 15 damage to wall even when caught, Crescent Cheese or Moon Cheese should be used to prevent its attraction. Attempting to cheap out with Gouda here only leads to unnecessary suffering.
| Event at Night and Dawn | Damage to Wall without Moat |
|---|---|
| Battering Ram Mouse Encounter | 15 |
| Successful catch of any mice except Battering Ram Mouse | 0 |
| Failure to Catch any mice except Nightfire Mouse without pillage | 3×(1+No. of Monster of the Meteor catches in your current run) |
| Failure to Catch any mice except Nightfire Mouse with pillage | 5×/1+No. of Monster of the Meteor catches in your current run) |
| Failure to Attract | 5 |
| Failure to Catch Nightfire Mouse | 10 |
Failure to Attract implies that your bait fails to lure the mice at Night away from wall, thus causing more damage than most Failure to Catch without pillage. Pillage is shown when you FTC a mouse and the box is red.
Use ACRONYM, Aqua Base along with Crescent or Moon Cheese during the Night phases. Weremice are abundant at Twilight, then become decreasingly common with the progression of Night. They are absent from First Light onwards. Weremice are weak to Shadow weapons and are the main source of Howlite. Cosmic Critters starts appearing at Midnight, then become increasingly common with the progression of Night. They are absent at Dawn. Cosmic Critters are weak to Arcane weapons and are the main source of Bloodstone.
Normally, a Shadow weapon is suggested in Twilight and Midnight while an Arcane weapon is suggested from Pitch onwards. However, Arcane Capturing Rod of Never Yielding Mystery outperforms all Shadow weapons except Reaper’s Perch.
At the beginning, you would not even come close to finishing the entire Night. However, at Night, you can obtain materials to upgrade your Wall, Ballista, Cannon, Moat and Mage Tower, which allow you to last longer at Night and eventually reach Dawn. On your first Night, loot 1 Howlite from Weremice and then retreat. Then get Ballista Upgrade #1: Basic Ballista. If you are extensively using Tower Mana, enter Night, loot 1 Howlite from Weremice again, retreat and then get Mage Tower Upgrade #2: Power Enchantment. Otherwise, this upgrade can be skipped.
You can opt to enter Night with very low wall health by converting all but 1-2 Meteorite Pieces into Crescent Cheese before repairing wall. This is a very intensive and optional way to conserve Meteorite Pieces when you are aiming for Howlite-only upgrades. Otherwise, just prepare enough Crescent Cheese for next run and enter Night again until you get enough resources for an important upgrade.
Loot at least 15 Howlite at Night (you probably need multiple runs) and get Wall Upgrade #2: Howlite Wall. This upgrade should allow you to reach Midnight occasionally. Whenever you have at least 5 Bloodstones, get Cannon Upgrade #1: Small Cannon. Otherwise, get Moat Upgrade #1: Small Moat and then Ballista Upgrade #2: Silver Ballista to help you stay at Midnight onwards. Once you get Cannon Upgrade #1, always stay at Night until running out of wall health instead of retreating for an upgrade.
Continue entering Night for Howlite and Bloodstone and get the following upgrades in order:
- Cannon Upgrade #2: Power Cannon
- Moat Upgrade #2: Big Moat
- Mage Tower Upgrade #3: Healing Enchantment (only if you use Tower Mana extensively)
- Wall Upgrade #3: Blood Bastion
- Mage Tower Upgrade #4: Sunsphere Enchantment (only if you use Tower Mana extensively)
- Cannon Upgrade #3: Energy Cannon
- Ballista Upgrade #3: Sunsilver Ballista
Once you get Wall Upgrade #3, you should be able to occasionally last through Night and reach Dawn. When you can consistently reach Dawn, you can opt to start a Fort Rox Treasure Map. It is fairly easy to complete and its slots can be sold on MouseHunt Discord if you wish. It is usually recommended to use Rare Map Dust on the map.
Its chest is the major source of Fort Rox Portal Console or Fort Rox Portal Core, which can be sold on Marketplace or used to purchase Fort Rox Portal Projector.
Dawn, the final stage.
At Dawn, retreating is no longer possible. Dawn Destroyers i.e. Monster of the Meteor and Dawn Guardian Mouse are found instead of Weremice and Cosmic Critters. They are weak to Arcane weapons and are the sole source of Dawn Dust. Each catch of Monster of the Meteor increases damage to the wall upon Failure to Catch of Monster of the Meteor and Dawn Guardian Mouse.
When damage multiplier is below 400%, Super Cactus Charm (available from Marketplace) or Ancient Charm (from mapping) are recommended to boost catch rate. When damage multiplier is at 400% or above or avoiding a pillage would prevent your wall losing all health, Shielding Charm (available from Marketplace) is recommended to stay at Dawn for as long as possible.
Loot 1 Inert Queso Dowsing Rod and at least 50 Dawn Dust from the mice here. Buy Queso Dowsing Rod with 200,000 gold, 1 Inert Queso Dowsing Rod and 50 Dawn Dust.
Claim the adventure Defend Fort Rox from the Monster of the Meteor once you have caught Monster of the Meteor.
After you have obtained Ballista Upgrade #3: Sunsilver Ballista, get Droid Archmagus Trap. Then get Interdimensional Crossbow Trap if you do not have Reaper’s Perch. Animatronic Bird and Silver Bolt required can be looted from Monster of the Meteor or purchased from Marketplace. Do not buy them with Dawn Dust.
If you are very tight on funds, you can skip the two weapons for now but eventually you would have to pick these two up, they would help you in Fiery Warpath and later stages of the game.
After getting the two weapons, you may consider getting Moat Upgrade #3: Silver Moat and then Wall Upgrade #4: Moonbeam Fortress. They are however optional if you don’t plan to stay at the area.
At Fort Rox General Store, extra Howlite can be converted to Meteorite Pieces while extra Bloodstone can be converted to Tower Mana. If you have obtained at least 3 Train Badges from Gnawnian Express Station, better conversion rates are available. At Fort Rox Cheese Shoppe, extra Dawn Dust can be converted to Sunrise Cheese.
Optional but recommended: Continue to do multiple runs till you collected an addtional 100 Dawn Dust for the Fort Rox portal. Buy it from the Cartographer with 100 Dawn Dust, 1 Fort Rox Portal Console and 1 Fort Rox Portal Core. You would then use the portal in Dawn. You would need Sunrise cheese for this step, you can buy it from the Cheese Shoppe but it is recommended that you get it one by one from the Marketplace.
Only use the portal when you have enough gold to buy 10 Sunrise Cheese from the Marketplace, however do not buy all 10 immediately, buy it one by one. Once you used the portal, you will face the Heart of the Meteor (HOTM). Everytime you attract HOTM, it gets weaker and weaker hence easier to catch. You could use an Ultimate Charm here, but it is recommended that you just buy more Sunrise cheese instead. After capturing the HOTM, you will receive Meteoric Core Fragments. Use it along with 60 Howlite and 10 Bloodstone to buy the Meteor Prison Core Trap (MPCT). It is a useful trap for future regions as well.
Travel to Fiery Warpath once you are done with Fort Rox.
Fiery Warpath

The Marching Flame has attacked and pillaged much of the Sandtail Desert and now their warpath is headed towards Gnawnia! Their battalions attack in waves and seem to endlessly march over the horizon. All that stands between them and conquering Gnawnia are the brave hunters who camp here.
Once you’ve traveled to the Fiery Warpath, which is the first area of the Sandtail Desert region, you will notice the extensive HUD (heads up display). In much the same way as the Tower or the Iceberg, the Warpath features a unique game mechanic which makes it very interesting and somewhat difficult during the first visit.
The Warpath consists of 4 Waves. Each Wave consists of a given number of mice that you have to defeat. Warrior, Archer and Scout are present in all waves. There are also Calvary, Mage and Flame Ordnance Mouse which appear at the later waves. The table below shows the primary and secondary weakness of each type.
- Warrior: Primary - Physical
- Archer: Primary - Physical
- Scout: Primary - Physical
- Calvary: Primary - Tactical, Secondary - Physical
- Mage: Primary - Hydro, Secondary - Physical
- Flame Ordnance Mouse: Primary - Arcane, Secondary - Physical
You are recommended to have the following traps
- Physical: Enraged Rhinobot
- Tactical: HVMT
- Hydro: Steam Laser Mk. I
- Shadow: ICT
The core mechanics of the area is streaking. Streaks can be achieved more easily by buying and arming special Warpath Charms, either regular ones or those strengthened by Magic Essence. These Charms will help attract a certain type of mouse, but they can fail in doing so. Catching any different mouse type, FTCs or FTAs will break a Streak.
- A Streak of 3 causes 2 mice of the same class to retreat
- A Streak of 6 causes 4 mice of the same class to retreat
- A Streak of 9 causes 6 mice of the same class to retreat
Tips
- Use (Empowered) SuperBrie+ to avoid Fail to Attracts (FTA),
- Buy the (Super) Variant Charms from the Charm Shoppe to assist in streaking,
- Use (Super) Warpath's Commander Charms to clear the Wave faster.
Leaving the Warpath by traveling somewhere else will NOT reset your progress, even Streaks will remain untouched and waiting for you when you return.
There is also a group of "Special" Mice found in the Warpath. These are mice that are not of the same type as the other mice in the Warpath. They are affected by the following:
- Crimson Commander Mouse
- Primary weakness - Physical
- Catching a Crimson Commander Mouse causes a number of mice from each class not yet fully defeated to retreat, equal to the current streak (or 1 in the absence of streak). The streak would also be broken. Using (Super) Warpath's Commander Charm increase the Attraction Rate of encountering it.
- Caravan Guard Mouse
- Primary weakness - Physical
- Failing to catch a Caravan Guard adds more mice to a Wave, one for each type of mouse. Although if you have friends in the same area, sometimes they are able to prevent Caravan Guards from doing so. If a certain type of mouse has been already extinguished from the Wave, Caravan Guards do not re-mobilize them or cause more to appear.
- Gargantuamouse
- Primary weakness - Draconic
- It may be encountered on a Streak of 7 or above. The chance of attracting Gargantuamouse increases with longer Streak and can be guaranteed by using Gargantua Charm (available from Marketplace) on a Streak of 7 or above. Catching it resets the Streak. You can earn some SuperBrie+ by offering to snipe this mouse for people on Discord.
Recommended Setup:
- Weapon: Enraged Rhinobot
- Base: Aqua Base
- Cheese: SuperBrie+ > Gouda > Brie
Wave 1
- Wave 1 consist of 35 Desert Soldier Mouse (Warrior), 35 Vanguard Mouse (Scout) and 35 Desert Archer Mouse (Archer).
- It is not recommended to use Warpath’s Commander Charm in Wave 1 unless you have a lot of them.
- It is recommended to focus on clearing individual classes before moving on to the next one.
- Crimson Commander Mouse and Caravan Guard Mouse retreats once there are 10 or fewer mice left to clear.
Wave 2
- Wave 2 consists of 40 Flame Warrior Mouse (Warrior), 40 Sentinel Mouse (Scout), 40 Flame Archer Mouse (Archer), 45 Sand Cavalry Mouse (Cavalry) and 20 Inferno Mage Mouse (Mage).The introduction of the 2 new classes makes this wave more difficult than Wave 1. They are also harder to catch than Warrior, Scout and Archer mice.
- Cavalry and Mage mice each drop Desert Horseshoe and Heatproof Mage Cloth respectively,which can be crafted into (Super) Warpath Cavalry/Mage Charm. You can also buy the charms from the Marketplace, this is highly recommended if this is your first run.
- Crimson Commander Mouse and Caravan Guard Mouse retreats once there are 18 or fewer mice left to clear.
- The recommended order for clearing Wave 2 is: Warrior, Scout, Archer, Cavalry, Mage.
Wave 3
- Wave 3 consists of 50 Crimson Titan Mouse (Warrior), 50 Crimson Watch Mouse (Scout), 50 Crimson Ranger Mouse (Archer), 30 Magmarage Mouse (Mage), 60 Sandwing Cavalry Mouse (Cavalry) and 20 Flame Ordnance Mouse (Artillery).
- Wave 3 is similar to Wave 2 with the addtion of Flame Ordnance Mouse. There is no class-specific charm for them.
- Crimson Commander Mouse and Caravan Guard Mouse retreats once there are 26 or fewer mice left to clear.
- The recommended order for clearing Wave 3 is: Warrior, Scout, Archer, Cavalry, Mage, Artillery.
Wave 4
- Wave 4 consists of 12 Theurgy Warden Mouse and 1 Warmonger Mouse. Streaks do not apply in Wave 4.
- You can choose not to use SuperBrie+ here and use Brie/Gouda instead.
- Warmonger Mouse is invulnerable until all 12 Theurgy Warden Mouse are cleared.
- Once you cleared 12 Theurgy Warden Mouse, swtich to your highest power base.
- Catching Warmonger Mouse ends Wave 4 and rewards you with 1 Warpath Victory. You then start over with Wave 1.
- On the first run, Warmonger Mouse always drops 1 Oasis Bead, 1 Sphynx Crystal or 1 Sandblasted Metal, which are one of the components needed to craft three fairly powerful but expensive weapons. After the first run, these loot are much rarer.
- You can earn some SuperBrie+ by offering to snipe this mouse for people on Discord.
Advice on what to do with your first loot from Warmonger:
- Oasis Bead - Sell it on the Marketplace.
- Sphynx Crystal - Sell it on the Marketplace.
- Sandblasted Metal - Wait for me to update this when FF launches.
Travel to Muridae Market after catching Warmonger Mouse.
Muridae Market

This fortified market has been ravaged by the relentless attacks of the Marching Flame. Local merchants are eagerly seeking the help of hunters to find construction materials and help rebuild their shops.
You are here to be a good citizen of the Kingdom and rebuild all the shoppes in the region. Use Enraged Rhinobot, Aqua Base or Remote Detonator Base and Brie/Gouda for the area. Hunting mice in the area drops the materials you need to rebuild the shops. Using SuperBrie+ attracts the Desert Architect Mouse, dropping more materials. However, it is usually not worth the cost.
It is advised to get some Artisan Charm with King's Credit. If you have Aristan Charm, hunt with it to get enough materials for the Cartographer, if not follow the guide below.
King's Credit | You can buy some Artisan Charm. Arming Artisan Charm enables you to attract Blacksmith Mouse and Mage Weaver Mouse, both dropping more materials compared to the rest. Artisan Charm also prevents the attraction of the Desert Nomad Mouse.
Order of Shoppe to repair:
- General Store
- Limestone Brick: 60
- Coconut Timber: 40
- Charm Shoppe
- Limestone Brick: 160
- Coconut Timber: 100
- Molten Glass: 120
- Cartographer
- Limestone Brick: 30
- Coconut Timber: 20
- Papyrus: 25
- Trapsmith
- Limestone Brick: 70
- Coconut Timber: 120
- Molten Glass: 60
- Cheese Shoppe
- Limestone Brick: 30
Check out the General Store since it allows you to convert your materials saving you some hunts here.
After repairing the Cartographer, buy all 3 Map Pieces. If you do not have enough Molten Glass for Sunken Souvenir, you can buy Molten Glass from the General Store or continue to farm materials for that.
You do not have to repair all the shop for progression but you can if you want to claim the Adventure Rebuild the Muridae Market.
Once you have gotten all the Map Pieces, head over to Living Garden to embark on a scenic route.
Living Garden
The mice that live in this garden use the environment to their advantage, fashioning crude armour and weapons from plantlife in order to protect and hoard all the Garden Essences they can find.
Living Garden "Complex" consists of 3 areas:
- Living Garden
- Lost City
- Sand Dunes
Mice in each location drops a type of Garden Petals or Herbs, which are used to purchase cheese for the next location. Another important loot is Garden Essences. As shown in the Head-Up Display (HUD), there are 9 types of Garden Essences. They are shown in order:
- Aleth Essence
- Ber Essence
- Cynd Essence
- Dol Essence
- Est Essence
- Fel Essence
- Gur Essence
- Hix Essence
- Icuri Essence
Essences can be upgraded to the next tier when crafted with 1 Essence Prism and 3 Essences. This is the only reliable way to obtain the more advanced Garden Essences. Ber Essence or above can also be smashed into the equivalent number of Aleth Essences. For example, Ber Essence can be smashed into 3 Aleth Essence while Cynd Essence can be smashed into 9 Aleth Essence. This does not refund any Essence Prism spent so think twice before upcrafting Garden Essences.
Your first stop will be Living Garden itself. Use a Hydro weapon, Aqua Base and Gouda Cheese here. Buy 10 Blue Double Sponge Charm from the Marketplace. Loot 20 Dewdrops from mice (only available when Blue Double Sponge Charm is armed). Click "Pour" in HUD, this will cause Thirsty Mouse to appear for the next 35 hunts. Thirsty Mouse drops Ber and Cynd Essences. Repeat the cycle until you have looted 90 Dewthief Petals. Purchase 90 Dewthief Camembert from Living Garden Cheese Shoppe directly at 1 Dewthief Petal and 750 gold each. Dewthief Camembert 4-Pack is not worth its cost.
If you have Interdimensional Crossbow Trap, travel to Sand Dunes. If not, travel to Lost City.
Sand Dunes: Use Interdimensional Crossbow Trap, Aqua base and Dewthief Camembert here. Buy 1 Grubling Bonanza Charm from Marketplace. Catching a mouse with Grubling Bonanza Charm triggers a Grubling Stampede, which otherwise only occurs randomly. Buy 15 Grubling Chow Charm from Sand Dunes Charm Shoppe. During Grubling Stampede, switch to Grubling Chow Charm to attract Grubling Mouse, which drops Cynd Essence. A Grubling Stampede lasts for 15 hunts. Once it has ended, buy another Grubling Bonanza Charm from Marketplace to trigger one again. Repeat the cycle until you have Garden Essences equivalent to 105 Aleth Essence. Then, travel to Living Garden.
Lost City: Use Droid Archmagus Trap (preferred) or Arcane Capturing Rod of Never Yielding Mystery, Aqua Base and Dewthief Camembert here. Buy 1 Searcher Charm from Lost City Charm Shoppe and use it. Catching a mouse with Searcher Charm dispels the Lost Curse and enables the attraction of Essence Collector Mouse, which can drop Ber Essence and Cynd Essence. Disarm your charm and try to catch a few Essence Collector Mouse. Cursed Mouse can be attracted after the first 3 hunts at Lost City after dispelling the curse. Any attraction of Cursed Mouse re-ignites the Lost Curse. When the curse is re-ignited, buy 1 Searcher Charm from Lost City Charm Shoppe to dispel the curse again. Repeat the cycle until you have Garden Essences equivalent to 105 Aleth Essence. Then, travel to Living Garden.
Living Garden again: Upgrade your Garden Essences until you have 5 Dol Essences. Purchase 1 Rift Detector from Living Garden Cartographer.
Claim the adventure Obtain a Rift Detector.
If you have not ranked up to Count/Countess, hunt at Fort Rox to get all 3 traps there - Droid Archmagus Trap, Interdimensional Crossbow Trap and Meteor Prison Core Trap if you don’t have them yet. After that, farm as much gold as possible at Fort Rox until you ranked up to Count/Countess.
What to do next
Once you have ranked up to Count/Countess, travel to the Queso River.